
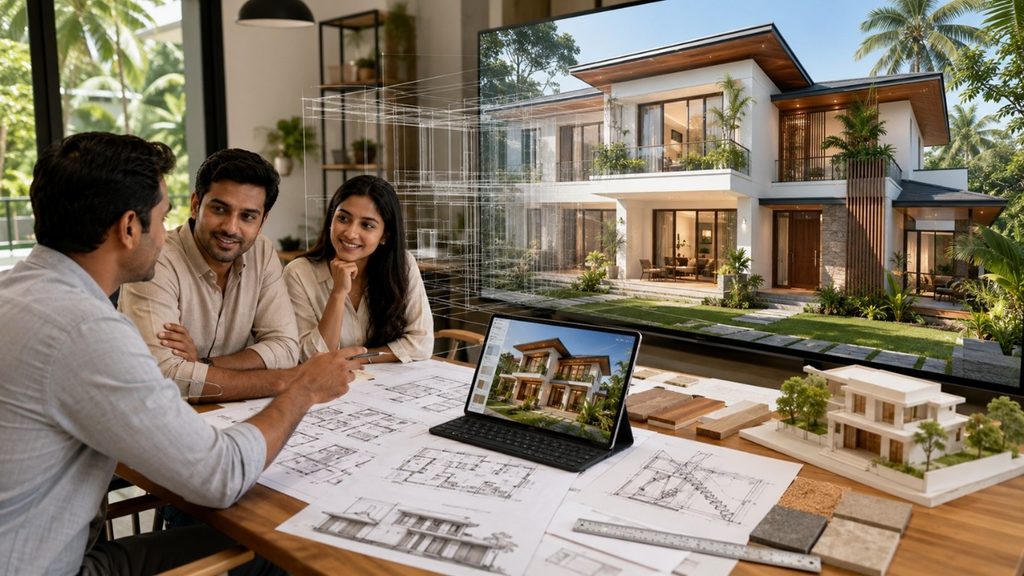
Approving a floor plan is an important stage in designing a home, but technical drawings are not always easy for homeowners to visualise. A room may appear spacious on plan, a passage may seem wide enough, and a window may appear correctly positioned, yet the completed space can feel very different.
This is the point at which 3D visualisation becomes useful. It transforms technical floor plans and elevations into understandable visuals that depict the potential appearance and feel of the proposed home after it is built. Before building starts, homeowners can examine room dimensions, furniture placement, ceiling heights, doors, windows, staircases, materials, and connections between areas.
Identifying these issues during the design stage can help Sri Lankan homeowners avoid unnecessary alterations, material waste, delays and additional construction costs.
This guide explains how 3D visualisation can help you understand your architect’s drawings, identify potential design problems, and make better decisions before construction begins.
1. What Is a 3D Architectural Visualisation?
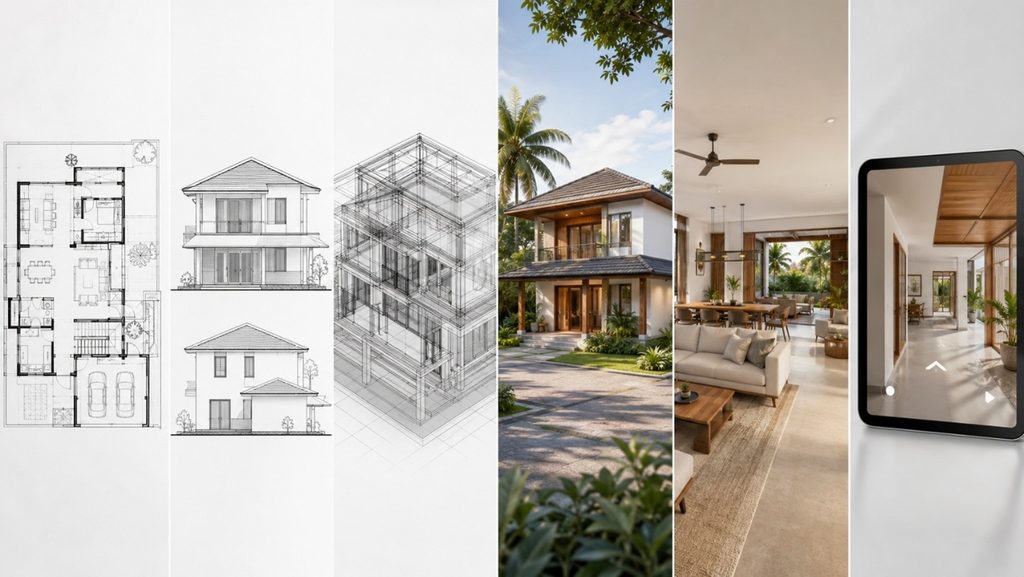
An architect’s technical drawings are not replaced by a 3D architectural visualisation; rather, it is a visual interpretation of them. It includes:
- 2D floor plan: A top-down drawing showing the arrangement and dimensions of rooms, walls, doors and other key elements.
- Architectural elevations: flat drawings of the front, rear, and sides of a house that display height, window locations, and roof shape without any three-dimensional depth.
- A three-dimensional model: a digital representation of the house constructed with actual height, breadth, and depth so that it may be viewed from any angle rather than simply straight on or directly above.
- Exterior 3D visualisations: Realistic pictures or renders of the exterior of the house, including the materials, colours, and landscaping.
- Interior 3D visualisations: lifelike pictures of specific rooms from the inside that depict the actual appearance and feel of spaces, furnishings, and finishes.
- Virtual walkthroughs: a moving, first-person perspective that allows you to “walk” through each room of the house as though you were inside it.
While the technical drawings continue to serve as the project’s legal and constructional foundation, its goal is to convert lines, symbols, and dimensions into something a homeowner can truly visualise.
2. Why Do Homeowners Find It Hard to Understand Floor Plans?
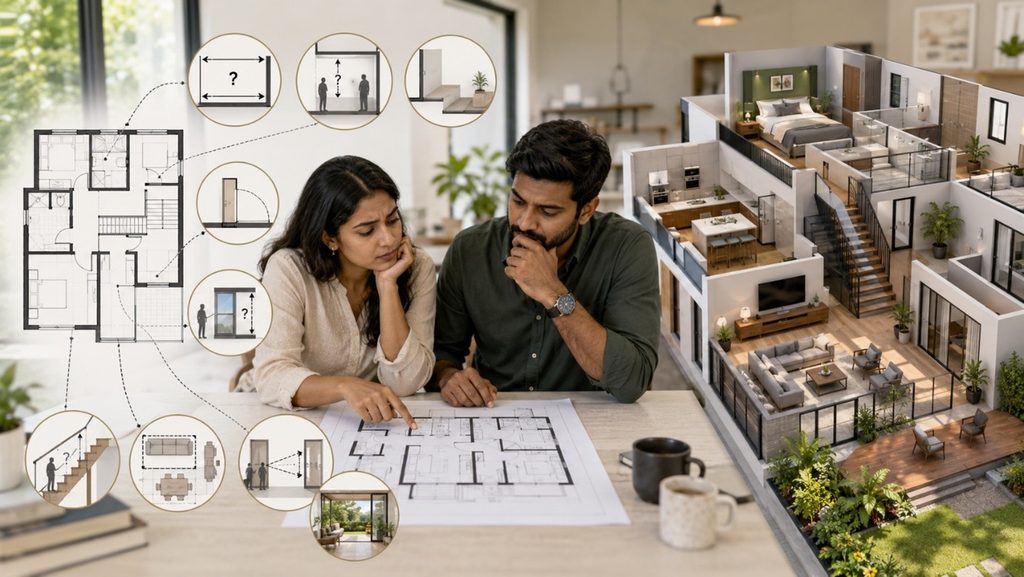
Many homeowners are able to recognise specific rooms on a design, but they find it difficult to visualise:
- Actual dimensions of the room: a figure like “12ft x 14ft” on a plan doesn’t give you an idea of how the space will feel when you stand in it.
- Ceiling heights: Because floor plans are created from above, they only depict length and width; they don’t indicate how high or low a room would seem.
- Variations in floor levels: on a flat drawing, it’s easy to overlook little stairs or level changes between rooms, which are typical with sloped ground.
- Door swing directions: a plan indicates the location of a door, but it may not necessarily indicate how far it swings open or what it might run into.
- Window heights: A 2D plan rarely makes the position of a window on the wall, whether it is high, low, or clear centered.
- Staircase dimensions and headroom: A staircase’s breadth, steepness, and headroom are difficult to determine from a straightforward line drawing.
- Clearances for furniture: just knowing the size of a room does not guarantee that you will have enough room to walk around a bed, sofa, or dining table once it is set up.
- Sightlines connecting the rooms: it’s difficult to tell what you’ll actually see (or who can see you) standing in one room and looking into another.
- Indoor-outdoor connection: how a living room opens onto a garden or veranda, for example, is hard to picture from a flat, top-down view.
The earliest phases of the design process, which include assessing room sizes with furniture, verifying privacy, and monitoring circulation, are specifically designed to fill this gap. These same checks are much simpler to perform with a 3D visualisation.
3. How Does 3D Visualisation Make a Floor Plan Easier to Understand?
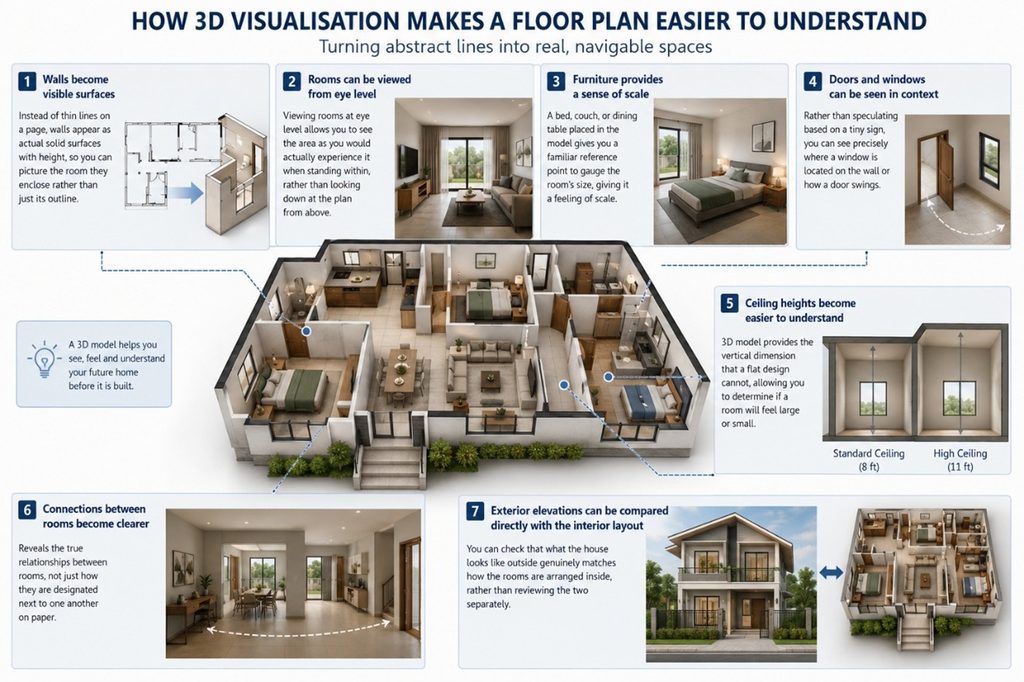
Abstract lines are transformed into identifiable, navigable places via a 3D model:
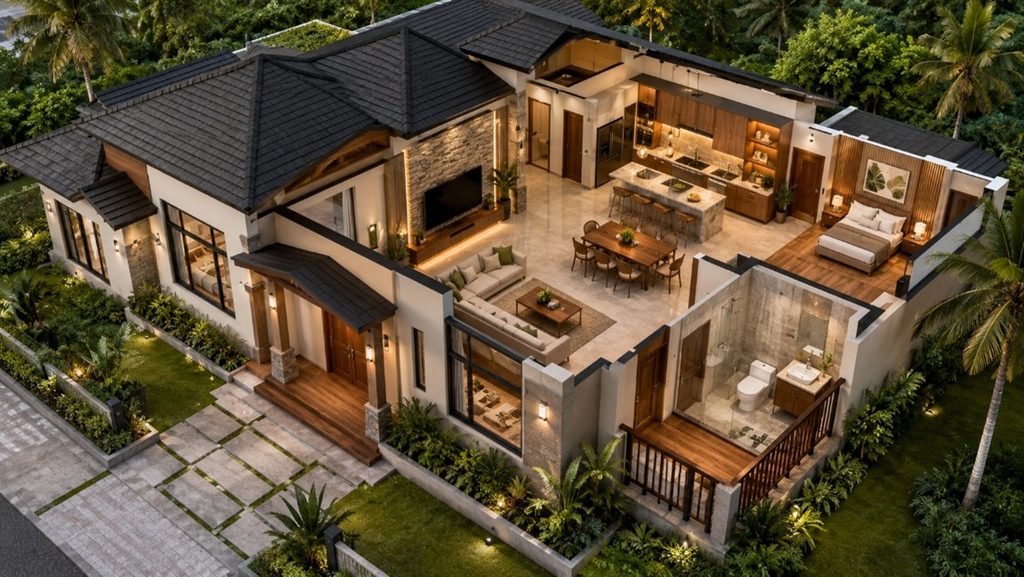
- Walls become visible surfaces: instead of thin lines on a page, walls appear as actual solid surfaces with height, so you can picture the room they enclose rather than just its outline.
- Rooms can be viewed from eye level: Viewing rooms at eye level allows you to see the area as you would actually experience it when standing within, rather than looking down at the plan from above.
- Furniture provides a sense of scale: A bed, couch, or dining table placed in the model gives you a familiar reference point to gauge the room’s size, giving it a feeling of scale.
- Doors and windows can be seen in context: rather than speculating based on a tiny sign, you can see precisely where a window is located on the wall or how a door swings.
- Ceiling heights become easier to understand: A 3D model introduces the vertical dimension that a floor plan cannot fully communicate, making it easier to judge how spacious or enclosed a room may feel.
- Connections between rooms become clearer: The model shows how adjoining spaces relate to one another and how people may move between them.
- Exterior elevations can be compared directly with the interior layout: you can check that what the house looks like outside genuinely matches how the rooms are arranged inside, rather than reviewing the two separately.
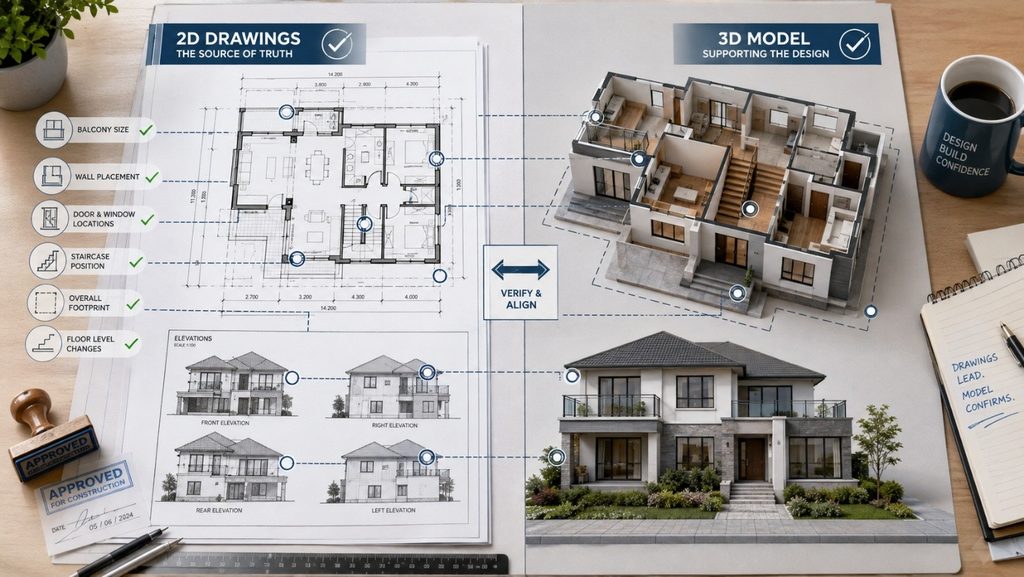
4. Verify that the approved floor plan and the 3D model match.
A 3D visualisation is only useful if it accurately reflects the approved architectural drawings. Compare the model against the floor plan and elevations before reviewing its appearance.
Pay particular attention to wall positions, room dimensions, doors, windows, staircases, balconies, floor levels, the building footprint and roof form. Even small differences can affect circulation, privacy, ventilation or the appearance of the completed house.
The technical drawings remain the primary source of construction information; the 3D model should support them rather than replace them.
5. Determine Whether a Room Is Too Small
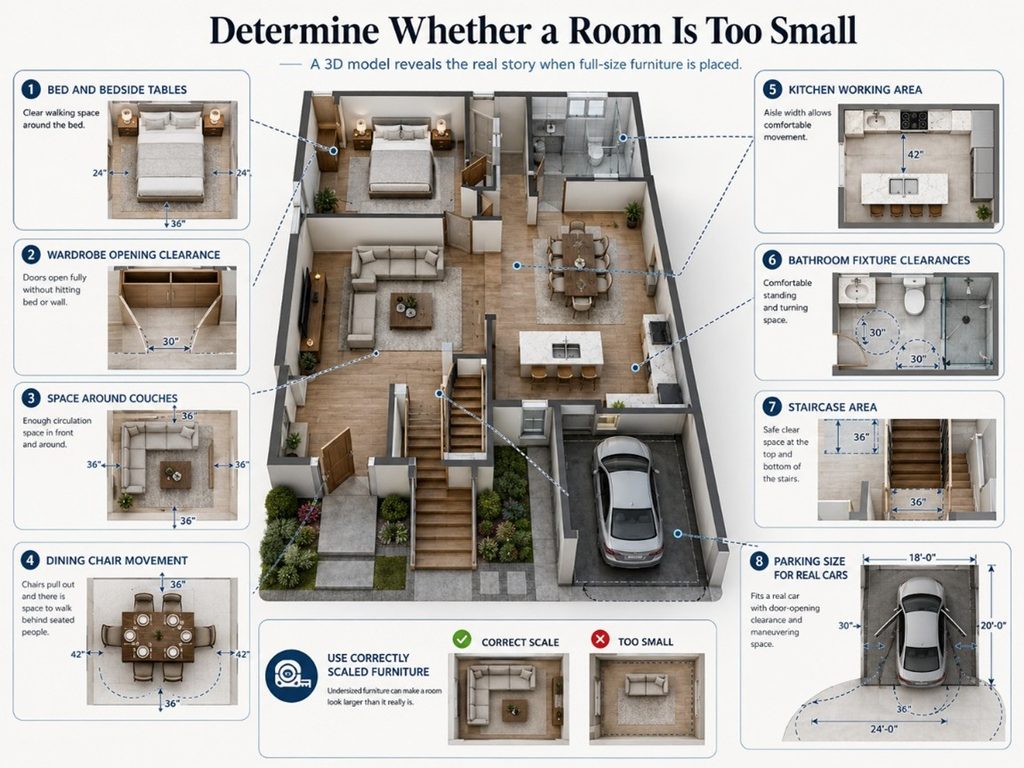
On a blueprint, a room could seem sufficient, but after furniture is added, it may feel constrained. Review:
- Bed and bedside clearance: check whether there’s still comfortable space to walk around the bed and reach the bedside table once both are placed, not just whether the bed itself fits.
- Clearances for wardrobe opening: make sure the wardrobe doors can fully open without hitting the bed, wall, or another piece of furniture.
- Circulation around sofas: confirm there’s enough room to walk around or in front of the sofa comfortably, rather than having to squeeze past it.
- Movement of dining chairs: check that chairs can be pulled out and that people can walk behind someone seated, without bumping into a wall or another chair.
- Working area in the kitchen: make sure there’s enough space to stand, move, and work between counters, not just enough space for the counters themselves.
- Clearances for bathroom fixtures: confirm there’s comfortable space to stand, turn, and move between the sink, toilet, and shower or bath.
- The area surrounding the staircase: check that there’s enough clear space at the top and bottom of the staircase for safe, comfortable movement.
- Vehicle and parking clearance: verify the parking space actually fits your vehicle’s real dimensions, with enough room to open doors and manoeuvre, not just its outline on paper.
Furniture in the 3D model should be accurately scaled. Undersized furniture can make a room appear more spacious than it will actually feel once built and furnished.
6. Identify Uncomfortable or Wasted Circulation Space
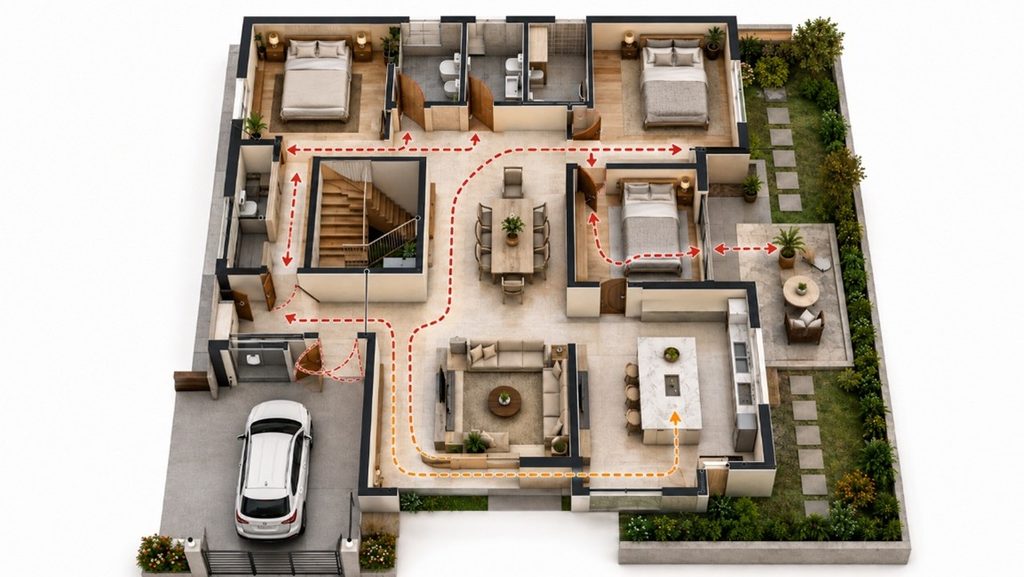
Examine how people will actually navigate the house using the visualisation. Search for:
- Extended or superfluous hallways: Long hallways that are only used to connect rooms take up floor space and don’t actually contribute any living space, so see if they can be shortened or eliminated.
- Tight spaces: narrow passages that feel cramped to walk through, especially where two people might need to pass each other.
- Doors that prevent people from moving: doors that, when open, block a walkway or force people to step around them to get through.
- Conflicting door swings: Check whether two nearby doors collide with or obstruct each other when opened.
- Routes that go via private areas: a path that uncomfortably passes past a bedroom or other private space on its way from one shared area to another.
- Accessing the kitchen from the parking lot is difficult: see whether bringing goods in from the car requires an inconvenient or needlessly lengthy path.
- Inadequate links between indoor and outdoor spaces: a dining room or living room that is difficult to reach from a patio, garden, or veranda, making the outdoor area seem isolated.
- Staircases interrupting the main circulation route: a staircase positioned so that it interrupts the main path through the house, forcing people to walk around it to get where they’re going.
7. Examine the kitchen before building
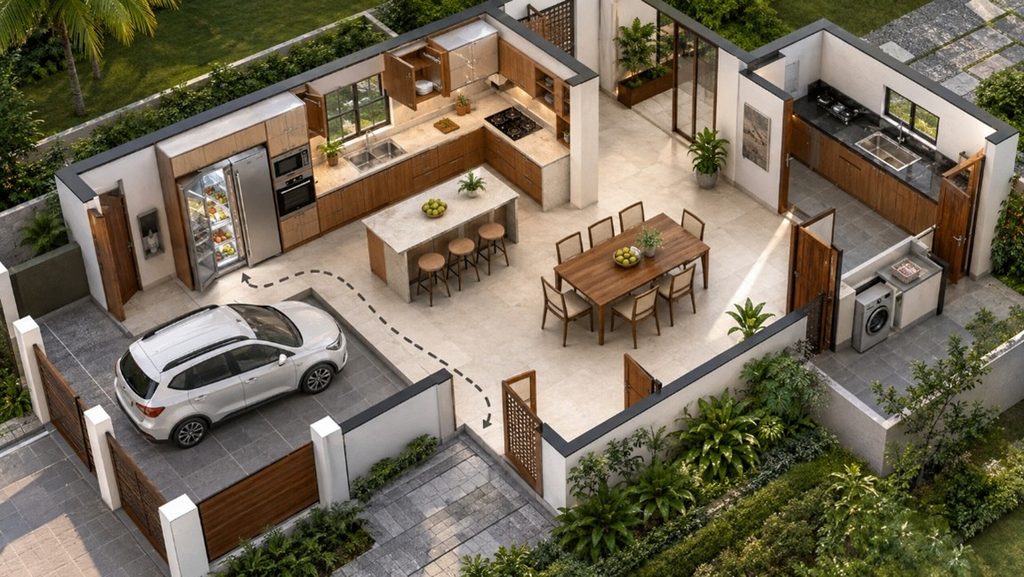
After plumbing, wiring, and finishes are finished, kitchen renovations can become especially costly. The 3D display ought to display:
- Pantry arrangement: how the everyday, lighter-use kitchen area is laid out, including where counters, storage, and the sink sit.
- If necessary, a separate wet kitchen: a distinct space for heavier daily cooking, kept apart from the pantry to contain smoke, smell, and mess.
- Position of the refrigerator: where the fridge sits, and whether its door can open fully without blocking a walkway or another appliance.
- Location of the cooktop and washbasin: whether the stove and sink are placed conveniently close to each other for everyday cooking movement.
- Counter depths and heights: whether the counters are a comfortable size and height to actually work at, not just wide enough on paper.
- Storage above: whether overhead cabinets are placed sensibly and are actually reachable, without colliding with light fixtures or extraction hoods.
- Locations of appliances: where major appliances (oven, microwave, washing machine, etc.) are positioned, and whether there’s enough clearance around each one.
- Route from parking to the kitchen: Check whether groceries can be carried directly from the vehicle to the kitchen without an unnecessarily long or awkward route.
- Relation to eating: how conveniently the kitchen connects to the dining area, so food doesn’t need to travel far once it’s ready.
- Walking area that is available: whether there’s enough clear space to move comfortably between counters, appliances, and other people while cooking.
This is also the time for Sri Lankan homeowners to determine whether the wet kitchen and open pantry actually function together for regular cooking, not just entertaining.
8. Examine windows, doors, and sightlines
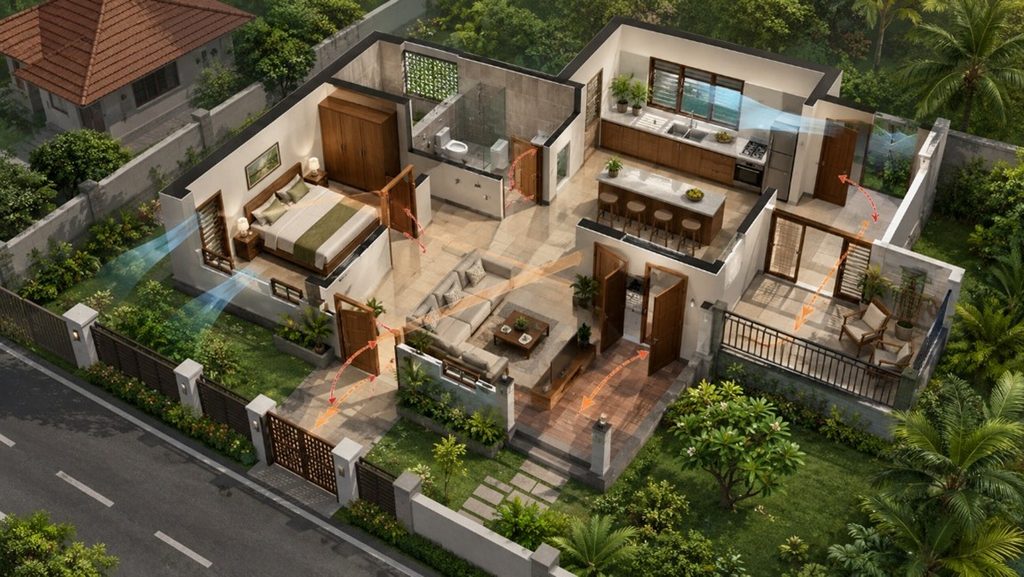
Poorly positioned doors and windows can affect furniture placement, circulation, natural light, ventilation, and how comfortably each room functions. A 3D visualisation makes it easier to review these openings in relation to the actual space rather than seeing them only as symbols on a floor plan.
- Door swings: Check the direction each door opens and whether it interferes with furniture, another door, or the main circulation path.
- Furniture blocking windows: Make sure beds, wardrobes, cabinets, or other large furniture do not obstruct windows or reduce natural light and ventilation.
- Window heights: Review whether windows are positioned at a practical height in relation to beds, desks, kitchen counters, bathroom fittings, and built-in furniture.
- Window proportions: Check whether the size and shape of each window suit the room and provide the intended balance of daylight, ventilation, and wall space.
- Access around doors: Confirm there is enough clear space around bedroom, bathroom, kitchen, and entrance doors for comfortable everyday movement.
- Balcony-door operation: Make sure balcony doors can open fully without reducing the usable balcony area or obstructing circulation inside the room.
- Garden and veranda access: Check whether doors leading to gardens, courtyards, or verandas create a natural connection between indoor and outdoor spaces.
- Relationship between openings and furniture: Review whether doors and windows work with the proposed furniture layout rather than forcing furniture into inconvenient positions.
- Cross ventilation: Where natural ventilation is intended, check whether the position of windows and doors allows air to move effectively through the room.
Reviewing doors and windows in 3D helps confirm that each opening works practically with the room layout, furniture, circulation, and ventilation before the design is finalised.
9. Understand Ceiling Heights and Vertical Spaces
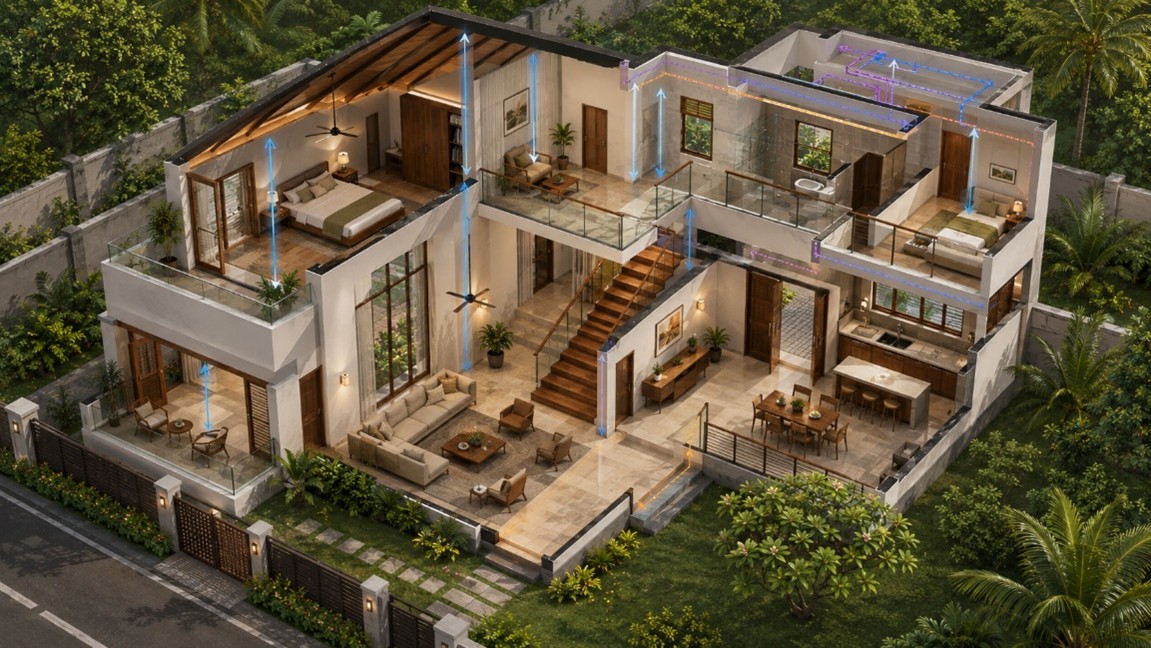
A floor plan mainly communicates horizontal arrangement and cannot fully convey the vertical experience of a room. Use the 3D model to review:
- Standard ceiling heights: confirm that regular rooms have a comfortable, consistent ceiling height throughout, rather than assuming it from the floor plan alone.
- Double-height living spaces: check how a taller, open space (like a living room with no ceiling above it) actually feels and looks, since these areas can be hard to picture from a flat drawing.
- Staircase headroom: make sure there’s enough clearance above each step so no one has to duck while going up or down.
- Voids and mezzanines: review any open gaps between floors or raised platform areas, since their size and safety are difficult to judge without seeing them in 3D.
- Bulkheads and dropped ceilings: check for any sections where the ceiling is lowered to hide ducting, beams, or pipework, and confirm they don’t awkwardly interrupt a room.
- Roof slopes: see how a sloped or pitched roof affects the ceiling shape and headroom in the rooms beneath it.
- Changes in floor level: spot any steps or level changes between rooms, which are easy to miss on a flat plan but noticeable once built.
- Upper-floor balcony proportions: confirm that balconies on upper floors are a comfortable, usable size relative to the rest of the house, not just adequate on paper.
Additionally, as ducting and wiring routes can subtly lower ceiling height if not planned in advance, cooperation with mechanical and electrical services becomes crucial.
10. Examine ventilation and natural light
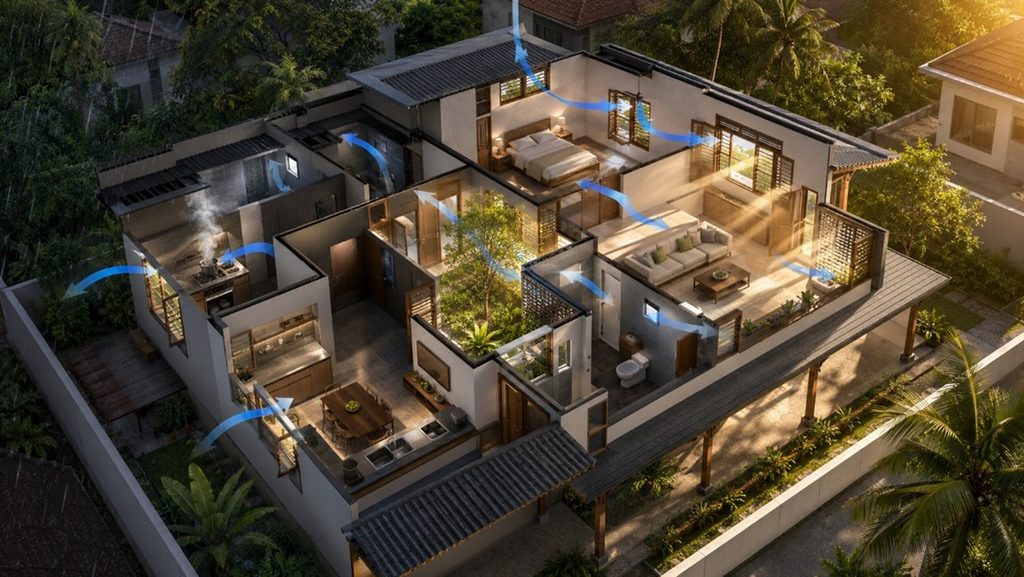
Although any daylight or sun research should ultimately be dependent on the proper orientation and surrounds of the property, a 3D model can assist in evaluating the location of openings. Review:
- Cross ventilation: check whether windows are positioned on opposite or adjacent walls to allow air to flow through a room rather than settle in one corner.
- Direction of the window: consider which way each window faces, since this affects how much heat, glare, or gentle daylight actually enters the room.
- Heat gain from west-facing openings: pay particular attention to windows receiving direct afternoon sun, which can significantly increase heat gain and glare.
- Devices for shading: check for elements like screens, louvres, or fins that reduce direct sun exposure without blocking airflow or views.
- Overhangs on roofs: see whether the roof extends far enough over windows and walls to protect them from both sun and monsoon rain.
- Light wells and courtyards: review any small open spaces designed to bring daylight and air into the centre of the house, where regular windows can’t reach.
- Bathroom ventilation: confirm bathrooms have a window or vent to manage moisture and odour, rather than relying only on artificial extraction.
- Wet-kitchen ventilation: check that the wet kitchen has adequate airflow to clear smoke, steam, and cooking smells effectively.
- Internal parts that could be dark: identify any rooms or corridors, especially in the centre of the house, that may end up relying heavily on artificial lighting.
- Effects of nearby structures: consider how neighbouring buildings might block sunlight or airflow to your windows, even if the design looks fine in isolation.
In Sri Lanka, orientation should also be reviewed against strong afternoon sun, high humidity and monsoon rainfall. These factors can have a major effect on thermal comfort, daylight, ventilation and weather protection.
11. Review Privacy Before Finalising the Design
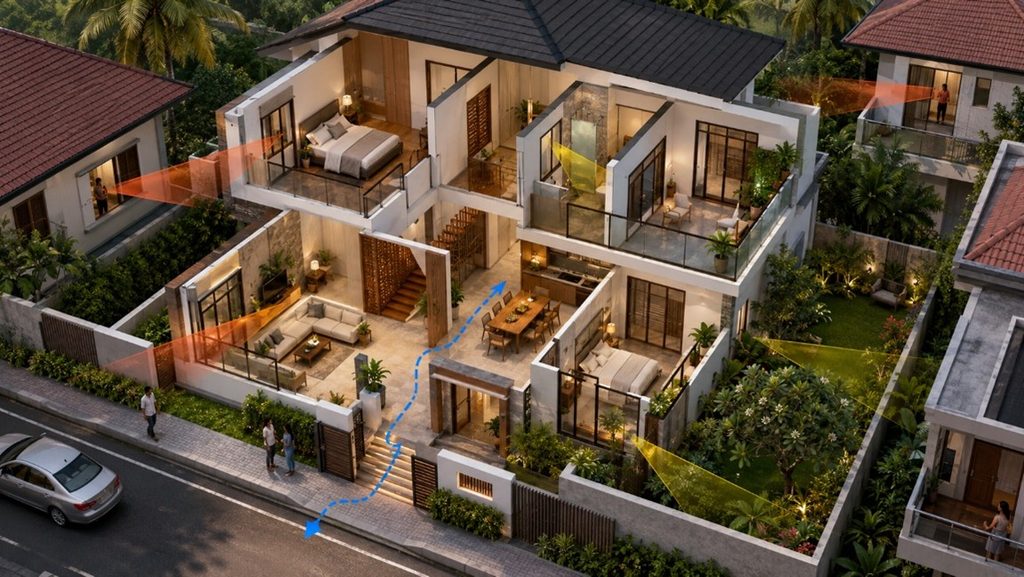
Privacy is easier to understand when the house is viewed from both inside and outside. A 3D model can help homeowners examine what may be visible from the road, neighbouring properties, balconies, and shared areas of the house before window and room positions are finalised.
- Views from the road: Check what someone standing or driving past the property may be able to see through front-facing doors and windows, particularly into living areas and bedrooms.
- Neighbouring windows and balconies: Review whether nearby houses have direct views into bedrooms, bathrooms, living spaces, balconies, or private garden areas.
- Bedroom privacy: Check whether bedroom windows are exposed to the road, neighbouring houses, shared outdoor areas, or upper-floor balconies.
- Bathroom privacy: Ensure bathroom windows are positioned, glazed, or screened appropriately to prevent unwanted views from neighbouring properties or public areas.
- Privacy between guest and family zones: Check whether visitors can reach the living, dining, or guest areas without unnecessarily passing through bedrooms or other private family spaces.
- Internal sightlines: Review what can be seen from hallways, staircases, living areas, and room entrances. A bedroom or bathroom should not become unnecessarily exposed when a door is opened.
- Balcony orientation: Consider whether balconies overlook neighbouring bedrooms, private gardens, or other sensitive areas, and whether neighbouring buildings overlook your own balcony.
- Garden and outdoor privacy: Check whether private outdoor spaces require boundary walls, planting, screens, or other design measures to reduce direct views from adjoining properties or the street.
- Upper-floor views: Examine what can be seen from upper floors into lower-level rooms, courtyards, gardens, and neighbouring properties, particularly where double-height spaces or internal voids are involved.
Privacy should be considered from several viewpoints, not only from inside each room. Reviewing these sightlines in 3D can reveal exposure that may not be obvious from the floor plan alone.
12. Inspect the exterior from all angles.
The front elevation often receives the most attention because it is the primary view presented during design. However, the rear and side elevations also need to be properly resolved before the design is finalised. Review:
- Front elevation: the most visible face of the house, usually the one shown in marketing renders, but still just one part of the full design.
- Rear elevation: the back of the house, which is just as functionally important even though it’s rarely seen from the street.
- Elevation on the left: the left-facing wall, which may sit close to a boundary or neighbouring property and deserves the same attention as the front.
- Elevation on the right: the right-facing wall, often overlooked simply because it isn’t the “showpiece” side of the house.
- Design of roofs: how the roof looks and functions from every angle, not just how it appears in the main rendered view.
- Boundary connection: how the house relates to the edges of the plot, including setbacks and the gap between the building and the boundary wall.
- Service areas outside: spaces like the utility yard or laundry area, which need a practical, functional layout even if they’re not visually prominent.
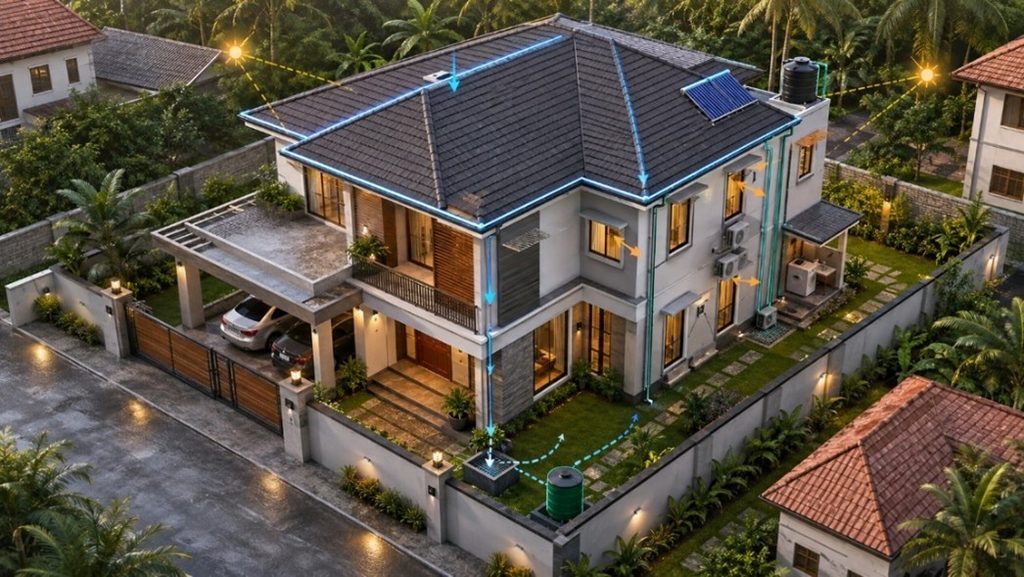
- Downpipes for rainwater: where rainwater pipes run down the exterior, since poorly placed ones can look untidy or interfere with the façade design.
- Outdoor air conditioning units: where compressor units sit on the exterior, ideally placed somewhere they won’t spoil the look of a key elevation.
- Locations of water tanks: where tanks are positioned, since an awkwardly placed tank can be visually disruptive if not planned into the design from the start.
- Parking and the entrance: how the driveway, parking area, and main entrance work together and present themselves as you approach the house.
- Relationship with nearby structures: how the house sits relative to neighbouring buildings, including shared boundaries, sightlines, and how close the two structures actually feel.
Even if some elevations are not visible from the road, all sides of the house should still be properly resolved.
13. Check Finishes and Materials Before Buying
Before ordering materials, the visualisation can be used to compare several design possibilities. Review:
- Colours of the exterior walls: see how different wall colours actually look on the full building, rather than judging them from a small paint swatch.
- Colour of the roof: check how the chosen roof colour works alongside the wall colours and the overall style of the house.
- Tiles and floor finishes: compare flooring options across different rooms to see how they’ll look once laid, not just as individual samples.
- Wooden finishes: review how timber elements, like doors, railings, or ceiling details, look against the surrounding materials.
- Colours of window frames: check whether the frame colour complements or contrasts with the walls and roof as intended.
- Kitchen finishes: see how cabinet colours, countertops, and backsplash materials look together in the actual kitchen layout.
- Bathroom finishes: review tile, fixture, and countertop choices as they’ll appear together in the finished bathroom.
- Feature walls: check how an accent or feature wall looks in context, since these are often a focal point of a room.
- The appearance of lighting: see how light fixtures look once placed, and get a sense of the mood or brightness they create in each space.
Final choices should still be checked against real samples before placing an order because rendered hues and textures may differ from real materials.
14. Coordinate Architectural, Structural and Building Services
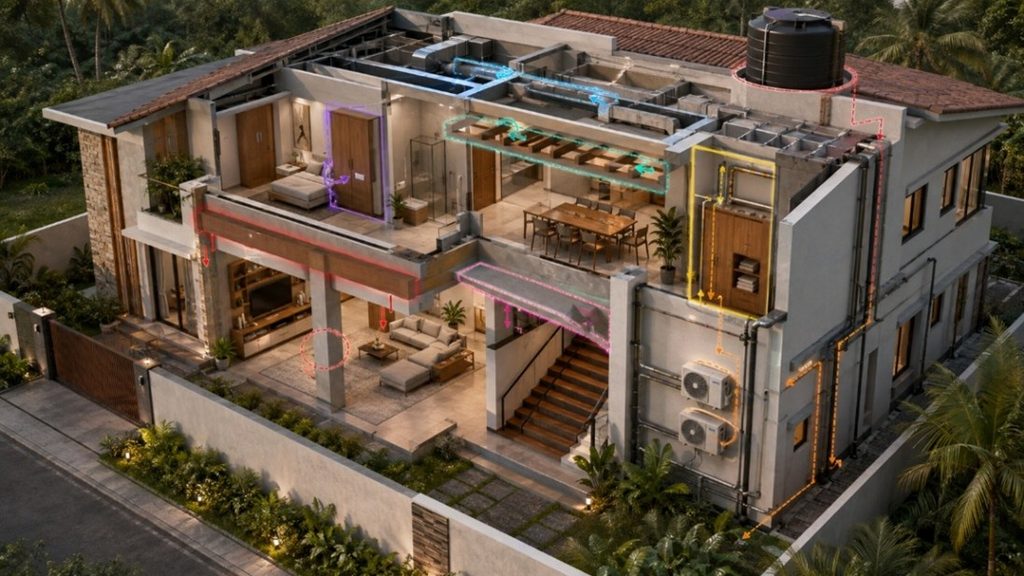
Inadequate coordination of drawings from several consultants might result in some of the most costly mistakes. The 3D model could show:
- Columns that obstruct rooms: a structural column landing awkwardly in the middle of a room or doorway instead of tucked into a wall or corner.
- Ceiling-lowering beams: a structural beam that forces the ceiling below it to be dropped, unexpectedly reducing headroom in part of a room.
- Cupboards are impacted by plumbing shafts: a plumbing shaft running through a space intended for built-in storage, cutting into the usable cupboard area.
- Visible façades crossed by drainage pipes: drainage pipes running across an exterior wall that’s meant to be a clean design feature, spoiling its appearance.
- Air conditioners in inappropriate places: outdoor AC units placed somewhere impractical to service, or somewhere that disrupts a key view or elevation.
- Furniture obstructing electrical points: a planned wardrobe, bed, or cabinet ending up positioned directly over a switch or power outlet, making it unusable.
- The roofline is impacted by water tanks: a water tank placed in a way that disrupts the intended shape or appearance of the roof.
- Conflicting ceiling designs with services: a decorative ceiling feature clashing with ducting, wiring, or piping that needs to run through the same space.
- Stairwells with insufficient headroom: a staircase where ductwork, beams, or piping above reduce headroom below a safe or comfortable level.
During the coordination stage, we review major structural and service elements against the architectural model before construction drawings are finalised. This can reveal issues such as a plumbing shaft reducing cupboard space or an AC drainage route appearing on a prominent elevation.
15. Examine the Construction Budget and the Visualisation
A visually impressive design can include features that have a significant effect on the construction budget.
- Large areas with glass: extensive glazing looks striking but adds cost through the glass itself, framing, and the extra structural support it often needs.
- Complicated roofing: multiple roof angles, levels, or shapes look distinctive but require more materials, labour, and waterproofing detail than a simple roof.
- Balconies with cantilevers: balconies that project outward without visible support underneath need extra structural reinforcement, which adds to the cost.
- Double-height areas: tall, open spaces look impressive but use more wall area, structure, and often cooling capacity than a standard-height room.
- Personalised windows: custom shapes or sizes of windows may cost more than standard ones, since they can’t be ordered off-the-shelf.
- Finishes that are imported: materials sourced from abroad often carry higher costs due to shipping, duties, and longer lead times.
- Large-scale woodworking: extensive timber detailing, whether structural or decorative, adds both material and skilled-labour cost.
- Integrated furnishings: custom-built cabinets, shelving, or seating cost more than off-the-shelf furniture, since they’re made specifically for the space.
- Ornamental façades: decorative exterior details add visual appeal but also add labour and material cost beyond a plain finish.
- Water features and swimming pools: these add significant cost, not just to build but to maintain, and often require additional structural and plumbing work.
- Intricate ceiling designs: detailed or multi-level ceiling features take more time, material, and skilled labour to construct than a flat ceiling.
After any major visual or design changes, request an updated cost estimate because even a minor aesthetic addition might have a disproportionately high price tag.
16. Record Design Changes Before Final Approval
Since details can quickly be forgotten, homeowners should refrain from providing instructions via sporadic calls and messages. An improved procedure is to:
- Examine every room methodically: go through the design room by room in a structured order, rather than jumping around, so nothing gets overlooked.
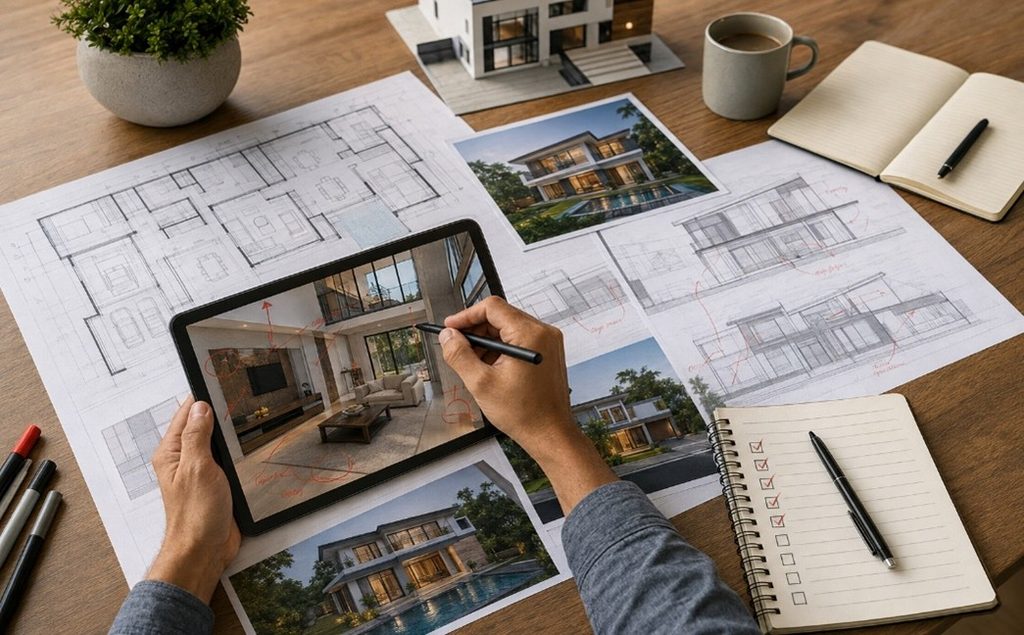
- Mark comments directly on the drawings or visualisations: Record feedback on the relevant drawing or render so that each requested change can be clearly understood.
- Create a single, comprehensive revision list: combine all comments and requested changes into one master document, instead of scattering them across separate notes or conversations.
- Request that the architect revise the elevations and floor plan: send the consolidated list to the architect so the official drawings are updated to reflect every agreed change.
- Verify that the updated 3D model corresponds with the drawings: check the revised visualisation against the updated floor plan and elevations to confirm they still match.
- Give written approval to the completed design: formally sign off on the final version in writing, rather than approving verbally, so there’s a clear record of what was agreed.
Every visual modification that has an impact on construction should be represented in the pertinent technical drawings rather than relying just on verbal knowledge.
17. Recognise the Limitations of 3D Visualisation
This is just as important as anything the model is capable of. A 3D visualisation on its own cannot confirm:
- Safety of structures: a render can look solid and finished, but it says nothing about whether the actual structure has been properly engineered to stand safely.
- Regulatory clearance: an approved-looking 3D model doesn’t mean the design has actually been approved by the local authority or UDA. That’s a separate process.
- The precise cost of construction: a visualisation shows the design, not the price; actual costs still depend on a proper quantity survey and cost estimate.
- Precise daylight performance in the absence of appropriate simulation: a basic render can suggest how light might enter a space, but only a proper daylight or sun study can confirm it accurately.
- Precise final colours: colours on a screen can look different from how the same material or paint appears in real light, so the render shouldn’t be treated as the final word on colour.
- Quality of materials: a render can make a material look premium or well-finished even if the actual product used ends up being lower quality.
- Performance of waterproofing: how a roof or wall looks in a model tells you nothing about whether it will actually keep water out. That depends on construction detailing and workmanship.
- Workmanship in construction: a polished visualisation doesn’t guarantee the quality of the actual building work carried out on site.
- Dimensional correctness in the event that the model was built from unfinished drawings: if the 3D model was created before the technical drawings were finalised, its measurements may not exactly match the final approved design.
It is not an engineering approval document; rather, it is a communication and design-review tool.
A Practical Sri Lankan Example
Imagine a family wanting to build a two-story home on a ten-perch plot in a suburb of Colombo. A separate wet kitchen at the back and a pantry next to the dining area are depicted in the floor plan. The arrangement appears sensible on paper.
The family discovers that the wet-kitchen door opens squarely against the back counter, the dining chairs leave little room for strolling, and the refrigerator door blocks the main path when the plan is transformed into a properly scaled 3D model. A bedroom window that faces directly toward the adjacent balcony is also visible in the upper-floor visualisation.
Relatively small changes can resolve these issues while the project is still at the design stage. If the same problems are discovered only after windows, doors, cabinets and finishes have been installed, correcting them may involve removal, replacement work and additional construction cost.
3D Visualisation Checklist Before Final Design Approval
- Does the model fit the most recent layout?
- Are the measurements of the room correct?
- Is the scale of the furnishings accurate?
- Is the area surrounding the furniture adequate?
- Do door swings appear correctly?
- Are windows positioned correctly?
- Is the stairwell secure and comfortable?
- Are ceiling heights depicted correctly?
- Are private rooms shielded from the outside world?
- Do kitchen appliances have a sensible placement?
- Are service areas designed appropriately?
- Have all external elevations been examined?
- Are the suggested finishes accessible locally?
- Does the design fit the climate of Sri Lanka?
- Have service and structural components been coordinated?
- Does the design still fit within the allocated budget?
- Have the technical drawings been updated with the accepted revisions?